It's time to write your first application! These detailed instructions are for users of Mac OS X. Instructions for other platforms are in "Hello World!" for Microsoft Windows and "Hello World!" for Solaris OS and Linux.
Mac OS X ships with version 1.4.2 of the Java programming language. This lesson explains how to upgrade to the most recent release, how to set up your development environment, and how to write your first application. You'll probably also want to read Apple's developer documentation for the Java platform.
A Checklist

To write your first program, you'll need:
- The latest version of Apple's runtime for the Java platform
Thanks to automatic software update, you may already have this. However, you can double-check by choosing "Software Update..." from the Apple menu. Select, download and install any available updates related to the Java programming language.
- The latest version of Apple's Developer Tools for the Java platform
Visit Apple's Java Downloads page and download the developer tools, not just the runtime. At the time of this writing, the most recent version available is the Java 2 Platform Standard Edition (J2SE) 5.0 Release 3 for Mac OS X v 10.4.2 or later. Note that installing this release will not replace your default version of 1.4.2; for that you must use the Java Preferences utility, available under
/Applications/Utilities/Java/J2SE 5.0/. On the "General" tab, select J2SE 5.0 under "Java Applet Runtime Settings", and drag J2SE 5.0 to the top of the list under "Java Application Runtime Settings". Your system is now configured to use J2SE 5.0.
- A text editor
Any text editor will work, but this example uses Xcode, a free IDE for Mac OS X. You can download the latest version of Xcode from Apple's Tools Downloads page. The instructions on this page reflect the default settings for Xcode 2.1.
Note: Although your OS X is now configured for J2SE 5.0, Xcode will still use J2SE 1.4 by default, even if you've changed your preference with the Java Preferences tool. The easiest way to update Xcode for 5.0 is to create (or download) a new Xcode template and drop it into the/Library/Application Support/Apple/Developer Tools/Project Templates/directory.If you prefer command-line access to the 5.0 development tools, the
/System/Library/Frameworks/JavaVM.framework/Versions/1.5/Commandsdirectory contains all the binaries that you'll need. For a description of these binaries, see "Hello World!" for Solaris OS and Linux.
Creating Your First Application
Your first application,
HelloWorldApp, will simply display the greeting "Hello world!". To create this program, you will:
- Create a source file
A source file contains text, written in the Java programming language, that you and other programmers can understand. You can use any text editor to create and edit source files.
- Build and Go
The Java programming language compiler (
javac) takes your source file and translates its text into instructions that the Java Virtual Machine can understand. These instructions are known as bytecodes, and are saved in a generated .class file. As an Xcode user, however, this process will be transparent to you. To compile and run your application, simply press the "Build and Go" button located at the top of the project window.
Create a Source File
With Xcode, you first create a project and then create or edit the source files in the project. Here are the exact steps you can follow to create an application implemented in a source file named
HelloWorldApp.java.
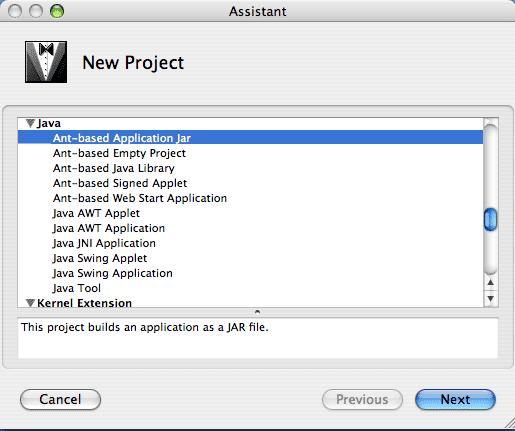
- Create a new project in Xcode. In the window that appears, scroll to the Java section and select Ant-based Application Jar (see the following figure).
The New Project wizard, with Ant-Based Application Jar selected
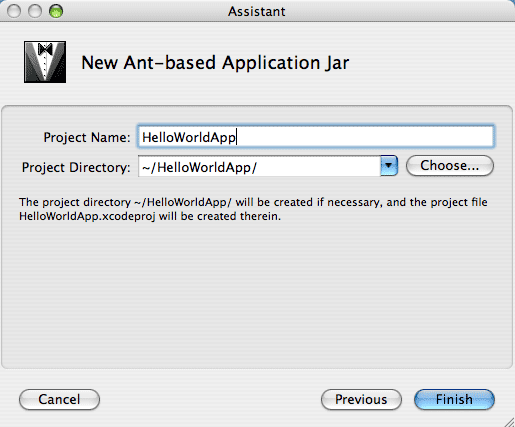
- Type
HelloWorldAppinto the Project Name field (see the following figure) and click Finish.A project window comes up (see the following figure) to help you maintain your new
The Project Name field now contains "HelloWorldApp".
HelloWorldAppproject. The project includes automatically generated files such asbuild.xmlandManifest, which are used when compiling the source file and bundling the finished application, respectively. It also includes a directory namedsrcthat containsHelloWorldApp.java.
The HelloWorldApp project window
- Click the src entry in the leftmost panel of the project window. You should now see the
HelloWorldApp.javafile created for your project.
- Pull the horizontal split pane from the bottom of the Xcode project window to reveal an editor, and then click (just once) HelloWorldApp.java. Or, double-click to make the file appear in its own window. You can now begin editing the file.
The HelloWorldApp.java source file appears in the editor pane.
- Edit
HelloWorldApp.javaso that it contains the following code:/** * The HelloWorldApp class implements an application that * simply displays "Hello World!" to the standard output. */ class HelloWorldApp { public static void main(String[] args) { //Display "Hello World!" System.out.println("Hello World!"); } }
Be Careful When You Type 
Type all code, commands, and file names exactly as shown. The Java programming language is case-sensitive, so you must capitalize consistently.
HelloWorldApphelloworldapp
top
Build and Go
Once you've finished editing the source file, press the Build & Go button at the top of the project window. If the source file successfully compiles, the application will be executed and you should see a window with "Hello World!", as shown in the following figure:
Output of the application, printing "Hello World!" to the screen
Congratulations! Your program works!
top


